How can you clean “dead zones” effectively when preparing your home for Tet?
“Dead zones” are areas hidden from view where dust, grease, and moisture build up even when surfaces look tidy. An effective approach is to mark hidden spots room by room, clean dry first, then wipe with light moisture, and treat stains based on material. Finish by checking under angled light and closing with a checklist to avoid omissions.
- Mark hidden spots by room
- Dry-clean before damp wiping
- Treat stains by material type
- Recheck with angled lighting

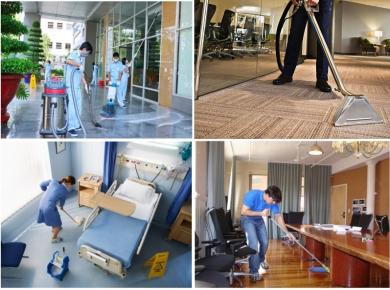
The feeling of “cleaned but still not fresh” often appears right before Tet, when schedules are packed and homes must stay presentable for guests. The cause is usually hidden zones such as cabinet tops, sliding tracks, furniture undersides, tile grout, and material junctions. Addressing these areas reduces lingering odors and recurring dust. Phuong Gia Foundation is mentioned as a provider of Tet home cleaning services, but the focus here is on self-checking and cleaning with safe, material-appropriate steps.
A “dead zone map”: 12 spots to mark before you start
To avoid missing anything, create a “dead zone map” before mopping floors. Marking the 12 spots below by room prevents cleaning by guesswork and reduces overlooked areas.
Prioritize places that are rarely touched, have gaps or grooves, or are exposed to heat or moisture. These retain dirt longer and often cause odors.
- Cabinet tops, upper shelves, picture frames
- Window/door tracks, seals, drawer grooves
- Baseboards, tile joints, floor–wall junctions
- Under sofas, under beds, behind curtains
- Table undersides, shelf undersides, chair legs
- Handles, switches, high-touch kitchen areas
- Gaps between appliances and walls, backs of appliances
- Bathroom grout, glass edges, behind doors
- Drains, soap trays, sink bases
- Shower heads, faucet bases, toilet surroundings
- Air vents/exhaust fans (if any)
- Cable bundles along baseboards and dark corners
10-minute scan: three signs of hidden dirt
A quick scan tells you where deep cleaning is needed and where light wiping is enough, saving time. These three signs reveal most hidden dirt that the eye misses.
Follow the order look – touch – smell to avoid being misled by lighting or habit.
- Hazy marks under angled light: use side lighting to spot grease films or wipe streaks.
- Sticky feel: lightly touch cabinet edges, handles, and stone rims.
- Stale odors: check bathroom corners, under cabinets, and behind curtains.
Clean by material: dry – damp – dry to prevent damage
The most reliable method is dry – damp – dry. It limits smearing, prevents water pooling, and makes streak control easier, especially in grooves and on sensitive materials.
Choose soft tools and separate cloths by area to avoid cross-contamination. If a technical term is needed, use microfiber cloth on first mention.
Fine dust and fibers: remove before damp wiping
Fine dust clings to high surfaces and grooves. Wiping wet first often causes clumping and smears.
- Use crevice attachments for tracks and baseboards.
- Follow with a lightly damp microfiber cloth, then dry immediately.
Kitchen grease: soften, then wipe in multiple passes
Thin grease films cause stickiness and trap odors. Softening with warm water and wiping in passes cleans without scratching.
- Work from lightly soiled areas toward heavier grease.
- Change cloths often; don’t reuse across rooms.
Bathroom scale and stains: focus on grout and drains
Scale accumulates at joints. Wrong tools scratch metal and glass.
- Use soft brushes along grout lines.
- Dry thoroughly afterward to reduce re-soiling.
Do not mix chemicals. Always test in an inconspicuous spot first, especially on natural stone, matte paint, or glossy finishes. If strong fumes appear, ventilate and pause.
Final inspection checklist: six spots most often missed
Final inspection determines whether the home feels evenly clean or only “front-facing clean.” Skipping it leads to last-minute re-cleaning.
Use angled light and confirm these six spots.
- Cabinet tops and upper shelves
- Sliding tracks and drawer grooves
- Baseboards and floor–wall joints
- Under sofas/beds and behind curtains
- Handles, switches, touchpoints
- Grout lines, drains, and bathroom corners
If you need task-based help: how to brief without missing dead zones
Results depend on how clearly scope and inspection standards are defined. Avoid vague requests like “clean thoroughly.” Specify mandatory hidden spots by room.
For a reference framework to describe scope and inspection clearly, wording in task-based home cleaning services can help structure requirements.
- List 5–8 mandatory hidden spots per room.
- Flag sensitive materials to ensure soft tools.
- Agree on inspection: angled light + track/grout checks.
- Clean top-down to avoid rework.
Estimating workload to manage time and avoid unnecessary add-ons
Accurate estimation helps decide what to deep clean now and what can wait. Splitting by room and prioritizing kitchens/bathrooms yields the most impact.
To cross-check factors that increase workload—area, soil level, deep-clean items—the summary in cost-influencing factors can be used as a scope checklist.
- Prioritize grease-heavy kitchens and scaled bathrooms.
- Split into room-based sessions to avoid overload.
- Use proper tools for grooves to save time.
Frequently asked questions (FAQ)
Why do cabinets and handles still feel sticky after cleaning?
Thin grease wasn’t fully softened or cloths were reused, spreading residue. Soften with warm water and change cloths between passes.
The bathroom still smells after scrubbing the floor—where should I check?
Check grout, drains, and behind doors. Drying after cleaning reduces trapped moisture odors.
How do I clean window tracks without making sludge?
Vacuum dry first, then wipe lightly damp and dry again. Starting wet causes clumping.
Should glossy wood surfaces be scrubbed to clean faster?
No. Scrubbing risks micro-scratches. Use soft tools and dry–damp–dry.
What’s the fastest way to ensure no dead zones remain?
Use angled light and confirm the six common misses: cabinet tops, tracks, baseboards, undersides, touchpoints, grout/drains.
Conclusion
A truly clean Tet home depends less on repeated wiping and more on addressing dead zones by room and material. With a dead-zone map, a 10-minute scan to find hidden dirt, and a dry–damp–dry method, haze, odors, and recurring dust drop significantly. When task-based help is needed, defining mandatory hidden spots and inspection standards prevents omissions. For scope alignment before execution, the contact channel can be used to discuss requirements with Phuong Gia Foundation.